
This Christmas card is easy to make. Did you notice it on p. 62 of the Holiday Catalogue?
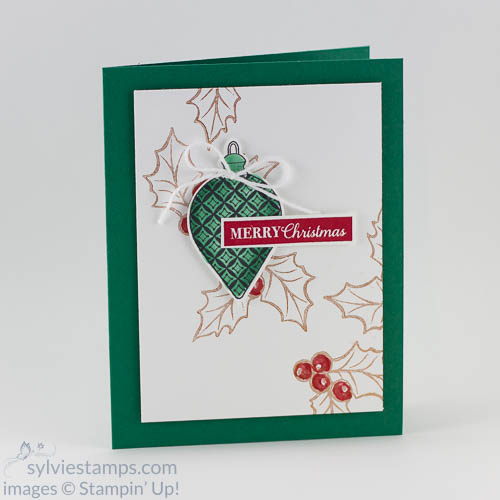
The Stampin’ Up! artists make a lot of gorgeous cards and projects. Sometimes they are too fussy for me but I really liked the beautiful simplicity of this card.
So first, here are the supplies I used:
Stamp set:
Christmas Gleaming Bundle (153006)
Ink:
Celestial Copper Ink pad (150707)
Real Red Stampin’ Write Maker (Regals 147155)
Shaded Spruce Stampin’ Blends combo (147938)
Memento Tuxedo Black (132708)
Real Red Classic Stampin’ Pad (147084)
Paper:
Shaded Spruce Cardstock (146981)
Whisper White Cardstock (100730)
Accessories:
Wink of Stella (141897)
White Baker’s Twine (124262)
Here is how to make this easy Christmas card:
Prepare your card shaded spruce card base by cutting the cardstock at 8 1/2″ x 5 1/2″ and scoring at 4 1/4″.
Cut a piece of whisper white cardstock at 3 3/4″ x 5″ and stamp the holly with the copper ink. You can use the sample as a guide or by all means, do it your own way!
Then, colour the berries with the real red marker, leaving a spot un-coloured. This gives the impression that the berry is round. I used the stamp design to guide me. I added Wink of Stella on the berries because you need some shimmer on a Christmas card.
So now you are ready to stamp the ornament with the black ink on a piece of whisper white cardstock and punch out with the largest punch in the bundle. Then we add colour to it and make it look 3 D.
So using the light shaded spruce blend, colour the whole ornament. Then use the dark shaded spruce blend and colour around the edges. After that, you want to come back with the light blend to smooth out the line between the dark and the light. Leave the center of the ornament with only one layer of colour.
Don’t worry if it’s not perfect because the greeting will cover part of it. Stamp the greeting on a small piece of whisper white cardstock and trim, leaving a small white border. Attach to the ornament with SNAIL then add dimensionals to adhere to the panel.
Finish it up
Adhere your finished panel to the card base. Add a baker’s twine bow with a glue dot as a finishing touch.
If you want to make this Christmas card and need supplies, you can click on the links to order directly from my online store. It will arrive to your door anywhere in Canada. Alternatively, you can email me your order.
Want more?
Want more Christmas card ideas? Make sure to subscribe to my mailing list. I send weekly emails with tutorials and tips but during the twelve weeks leading to Christmas, I send an extra one – exclusively for my mailing list subscribers. You have missed three weeks but there are still nine more tutorials to come!